Monday, October 28, 2013

Creative Creations DT - Sassy Studio Designs - Books

Greetings

I have been very busy with Halloween and Christmas cards and crafts so it was really refreshing to do a card that was very different.
This card I did for the the CREATIVE CREATIONS DT the theme of the challenge is Books (inspired by books) I chose to do this cute little Fairy Sassy tinker from SASSY STUDIO DESIGNS.

We would love if you would come over and play, take part in this awesome challenge and strand the chance of winning 4 Digi's from Sassy Studio Designs!!

I have always loved the story of Peter Pan and Wendy, and Neverland has always appealed to me and always been somewhere I could like to see my self living.  It has all the things that appeal to me, and fairies yes fairies like Tinkerbell ... I love tinkerbell!  She was essentially the only female in Neverland and yet managed to keep all the boys in line, what a woman!

One of my favourite quotes from the book:

“When the first baby laughed for the first time, its laugh broke into a thousand pieces, and they all went skipping about, and that was the beginning of fairies.”
― J.M. Barrie


Sassy Tinker - Pop up card


For this card I used an A5 card folded and then a pop up of Sassy Tinker on the inside, I coloured her with copics and the paper in the "book"  is Pebbles.


 The thought behind my card was to make the base look all old and vintage as the original Peter Pan was written in 1911 and then I made lil Tinker Sassy all bright as she is known and loved in the Disney movies today, the contrast is just beautiful.

There are so many other beautiful quotes from the book and I would love to share a couple more of my fairy fav's :

 
“One girl is worth more use than 20 boys.”
― J.M. Barrie


“All the world is made of faith, and trust, and pixie dust.”
― J.M. Barrie


Thanks so much for reading till the end, as always if you have any queries about this or any other project you have seen here I will be happy to answer what I can, ALL comments will be greatly appreciated.

Till next Time, keep it crafty


Thursday, October 24, 2013

Challenge - Outlawz - Awareness Card - MS

Greetings,

So here today I will proudly display a card that I finally finished late (Due October 17th) , I keep threatening to get my cards in on time and yet they are nothing but empty promises ... This challenge really struck a cord with me because I am such an avid supporter of MS (Multiple Sclerosis) Awareness.  Not many people know what this disgusting disease is and some very naive people think it can be cured by taking a holiday or changing your diet!

Well its real and sadly there is NO CURE!! It is destroying lives every day, it steals and robs family members from their families and steals futures out from its victims feet!  So even tho I was too late I decided to make this card anyway.  The ribbon colour for MS awareness is orange so I coloured my card theme orange and I am going to share it with as many as I can.  If you would share it too that would be so great, lets UNCHAIN the ignorance and rumors and start reaching and teaching people the truth about MS!!!

An awesome guy Johann I know from the MSSA group, he runs a project called Unchaining MS is a project to raise awareness for multiple sclerosis, including an annual bike trip. Next trip provisionally between 26 Apr - 10 May 2014. I love the slogan of his organisation and he kindly agreed to let me use it on my card!! If you would like to find out more click UNCHAINING MS to go his website or find him on Facebook

Here is my card I will still post to The Outlawz - October 17th challenge but not for a prize :)


Card made for an AWARENESS Challenge!

I bought this digi from KennyK and the name of this gorgeous image is Viki Lee Vicous I did wonder if she was any relation to Sid ;P 

I dont use orange much when colouring as a choice, I will if I am colouring something that is obviously orange, but given the choice I usually opt out.  So this was a challenge for me but in a good way as I got to make friends with all the oranges in the bunch :) The reason I chose her was that I wanted an image of a girl that couldn't be reconned with and Vikki here was the perfect match ...

I did alot more shading on her hair than you see here, but for some reason it didn't come out when I photoed it, the streaks look really obvious, but I love how unintentionally her hair looks like flames!


Close up of the coloured image
 

I searched the for a beautiful ribbon back ground paper that I could use but I could only find pink, so I made my own, I have sheets of this paper available in acetate and card and I can also do different coloured awareness ribbons if you like.  Just send me an email here and I can give you more details. I also printed the slogan from Johan on acetate as I had not yet decided which colour I was going to to the background.  

I think it all came together nicely and I really enjoyed making this card!

As always thanks so much for visiting and reading to this point! Your comments (good or bad) are always welcome and very much appreciated.  If you have a query about this or any other project you have seen on my blog please let me know and I will do my best to help you out.

Till Next Time, Keep it crafty,


Thursday, October 10, 2013

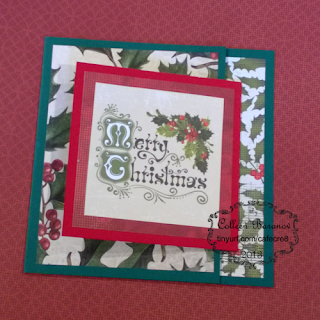
Joy Fold Christmas Card

By Colleen Baranov

 You will need:
  • 1 Sheet of card stock (25cm x 15cm) (green)
  • 1 Sheet of card stock in a different colour (10cm x 20cm) (red)
  • Printed Christmas themed paper about 3 different sheets
  • Sentiment or Christmas embellishment
  • Basic tools : Cutting knife or trimmer, craft mat, metal ruler, paper glue, embellishment glue.

Step One

 Cut out the 25 x 15 cm piece from one of the sheets of card, I used a dark green, and score it at 15 cm.  Next cut a 10cm x 20cm piece of card from the other colour (in my case red) and score that down the center at 10cm.


 Step 2

Fold your 2 piece of card on the scored line. Cut out the pieces from the printed paper in the following sizes: A) 14x14cm, B) 9 x 9cm and C) 14 x 9cm.
  

 Step 3

Open the large card - the small fold should open to the left, paste A (square of printed paper) onto the right hand side of the card and paste B the smaller square of printed paper on the FRONT of the smaller folded card.  NOTE: the smaller card should open (backwards) to the right!
 

 Step 4
Close the large card and paste the remaining piece C on the outer side of the card.


 Step 5
 Making double sure that the large card opens to the LEFT and the small card opens to the RIGHT, put some glue on the back of the small card and paste it in the center of the INSIDE of the larger card.


 Step 6
  To check that it is correct open both cards, fold the larger one, and then fold the smaller card over the front of the larger card. It should look like the pic above.


Last Step
   
 Lastly add your own personal sentiment or embellishment to the center of the smaller card, it could be a stamped image, a shaker box, a die or a cut out, the possibilities are endless.

Products used in this project - None sponsored
Treasures card stock pine and red
Kaiser Craft Paper - St Nicholas Collection and Christmas Carol Collection
Tombo Mono multi glue (green glue)


Things to remember:
  1. Make sure you have an envelope to fit your card and if yours is slightly smaller simply adjust the measurements at the top to fit, ie minus 1cm from each measurement.
  2.  If you are posting your card, make sure that the postage will cover the (not standard) size envelope you are using.
  3. Be careful when putting on embellishments, make sure they are not too bulky or fragile or they may be crushed during postage.
  4. A very useful tip is to put on the envelope - "handmade card only -NO VALUE" this will hopefully make it a little less tempting to possible thieves.
  5. Put your name PROUDLY on the back of the card! Regardless of how you rate your creation handmade cards and gifts are appreciated by ALL that count! 

This project can be purchased in a kit form from me at a cost of $7 incl P&P, the Kit will provide all the paper and card that you will need to complete this project as well as a paper sentiment.  It does not include any glues or tools.  You will need to cut to size all your own paper and card.  Please note that each kit's designs will vary from that shown in this project.


 Thank you for getting to this part of the tutorial, if you would like any more info on this or any other project on my blog please dont hesitate to contact me.  Comments, crits, and future tutorial requests welcomed :)

Till next time, keep it crafty


Tuesday, October 1, 2013

KennyK with sketch for Creative Creations Design Team

Greetings

I have been so busy sewing (yes I do sew ..... more about that in my next post)but still managed in between to get my fix of Copic Love and an awsome Kenny K image for the September Creative Creations Challenges Design Team.

We were given this sketch, and as cute as it was I still flipped mine 90' to the right!
 
  
September Sketch for Kenny K card

I am so in the spirit of Christmas ALREADY that I had to choose a Chistmas image, the one I chose from KennyK  and the gorgeous image I chose was Santa's Cookies she is such a cutie!! I also had this beautiful KC Christmas paper that I just got and wanted to use so I got colouring!!

I did this one first ....

KennyK image for Creative Creations DT


The Copic colours I used were: E51, R29, B12, G02, Y02, R37, R59, G05, B23, E43, E37, E33, W-3, YG63, E47, BV29, YG23 & colorless blender.  

The paper and sentiments used are from Kaiser Craft - Santa's List Collection.


I really liked the red and blue but then her face was a sun kissed for someone living in the snow ... lol so ......

Then I did this one .... 

KennyK image for Creative Creations DT  

This one is alot lighter and the tones alot more muted but it still has a festive feel.  I did a much lighter complexion here and this time with darker hair.
 

The Cpoic colours I used were: E51, C-5, YG03, BG15, YG63, E43, G00, R29, R00, R0, E57, YG11, RV29, R37, E31 & colorless blender.

The paper and sentiments used are from Kaiser Craft - Christmas Carol Collection.


I am not sure which image I prefer they are both so different, I am a little biased asz chartreuse is one of my favourite colours. 


Thank you for reading this far, I really appreciate it!  As always if you would like more info or have any comments on these or any other proects you see on my blog I am happy to share any advice or info :)

Keep it crafty, till next time